Installing Easycraft Onto A Steel Frame
These instructions are to be used when you are fixing Easycraft panels to steel frames that are either internal partition walls or backing onto an external wall. Some of the tools you may need include:
- Tape measure
- Hand or power saw
- Pencil
- Planer
- Spirit level
- Caulking cartridge gun
- Construction adhesive
- PVA adhesive
- String line
- P1 or P2 dust mask
- Screws – Self-Drilling CSK head Self embed head
- Drill & Phillips driver
- Safety glasses to comply with AS1337
- Gloves
Note: If you are installing in a wet area, please refer to the guidelines for Installation into wet areas (bathrooms and laundries).
Prepare The Steel Frame & Easycraft Panels
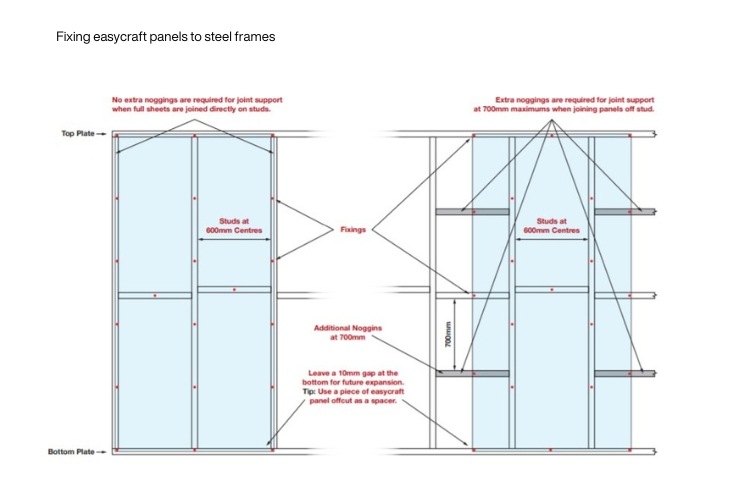
When prepping your frame, studs must be spaced at 450mm or less. If joining panels off stud, consider placing a noggin every 700mm to support the join. If installing a dado height wall, place a noggin along the top edge of each panel. Finally, check that the frames are straight and true.
Now it’s time to prep the Easycraft panels. We recommend they are acclimatised in the area where you want to install for at least 48 hours prior to installation. Any panels that will be installed backing onto external walls must be primed on the back (the face of the panel is already primed). This is important because priming the back of the panels will limit the intake of moisture present in external wall cavities.
11-Step Installation Guide
1. Start from one corner of the room.
2. When installing Easycraft panels over stud walls, apply generous dollops of flexible construction adhesive at 600mm intervals on each stud and each noggin behind the first panel. Follow the adhesive manufacturer’s recommendations for how much to use. (If installing Easycraft panels on existing walls, apply construction adhesive in a 5mm zig zag on existing lining).
3. Place a 10mm spacer (piece of timber or off cut of MDF) under the bottom edge of the panel to raise it off the floor (or skirting if installing on existing wall). It is important to have a 10mm gap at the bottom and top of all panels to allow for expansion and contraction.
4. Place the first panel on the wall.
5. Check the panel is plum (vertical) using a spirit level and fix the panel into the steel frame with screws.
6. Space the screws vertically approximately 500mm apart, fixing the panel to the studs and noggins.
7. Remove the spacer from the bottom of the panel.
8. Fix the other panels using the same method outlined above, working along the wall from the first panel.
9. Make sure you leave a 1.0mm to 1.5mm gap at each join to allow for expansion of the panels.
10. When you get close to a corner or a doorway, measure the gap from the fixed panel to the corner and cut the next panel so that it fits the remaining space. Fix the panel using the same method as described above.
11. When all the panels are fixed, fit skirtings and architraves and finish off any internal and external corners.
And that’s job done! Time to sit back and appreciate your DIY handiwork – and your spectacular Easycraft panels.
Stay informed about our latest releases by signing up to our mailing list here, or find out where to buy Easycraft from our list of resellers right across Australia.